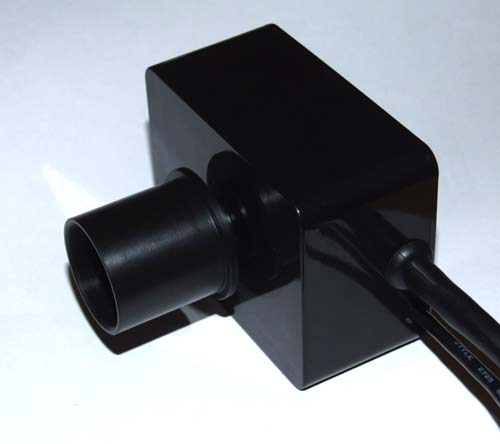
 I’ve rehoused my SPC900NC to allow better air circulation and to allow me to think about adding some form of cooling. I documented the process on the “Projects” page with some step by step photographs.
Author: admin
Thursday 19th July 2007
On the drive home from work yesterday I was looking at the clear sky, with just a few high clouds, and thinking maybe I was going to have another chance to test my modded spc900nc. As the evening dragged on and the sun dropped lower and lower to the hills behind my house I readied the mount and prepared my box of gadgets for an evening of imaging. It seemed like an age waiting for the first stars to appear and even though Arcturus was shining high in the south west, Jupiter was the first shiney to emerge from the darkening sky.
I spent an hour going through lists of visible objects, looking at those that I knew I could do better and adding those that I’d come across since drawing up my last list. All was ready, time slowed, Venus disappeared behind the hills and I started looking through the polar alignment scope trying to pickup the faint dot that was Polaris. A quick tweak of the RA alignment controls and I was set. I’d referred to “Polar Finder” (see software) before going to the scope in order to get the position of Polaris on the circle of the polar scope, so much easier than setting circles.
All the equipment whirred to life and I set the mount controller to the correct location and time. I then double checked the bolt that holds the mount to the tripod after leaving this loose the last time! After this I did a quick barlowed laser collimation to make sure the optics hadn’t shifted since my last viewing.
Still only Arcturus and Vega visible but I tried for a 2 star alignment. The controller reported “successful alignment” and I slewed the scope around to Jupiter. I was surprised to find the spc900 was working in video mode, I didn’t expect that with the parallel cable plugged in, but it was nice to see 4 moons shining alongside the huge disk of Jupiter. It was still too light to view deep sky objects so I fetched my Trust Spacecam and 3x barlow from the box and set about tweaking the contrast, brightness and exposure controls until I could make out faint detail on the shiney disk. I ran a couple of sequences with over 1000 frames in each and adjusted the focus between each as I couldn’t tell if the image was focused due to the lack of detail. I’ll process these later this evening and get the images on here if they’re any good. I was happy with the tracking, doing the bolt up makes a difference, and as the sky was now much darker I thought it time to try for some deeper objects.
I started with a 3 star alignment then selected M51, good old M51, and switched K3CCDTools to long exposure mode. The image didn’t show anything. I tweaked the gain, still nothing. I set the camera to 10 seconds, still nothing. You can see where this is going, I should have realised when the camera was operating in video mode that something was amiss. I checked the SC LX settings, then took the camera inside and popped the case off to check for broken wires. Nothing obvious.
My feeling was that after experimenting with guide software I must have installed something that overwrote a DLL used by K3CCD. I reinstalled K3, I uninstalled the other software, I tried K3 version 1, I even plugged a USB wireless network adapter in and ran Windows Update, which took over 1/2 an hour. It was approaching 1am by now and with work the next day I couldn’t spend any more time trying to fix the camera. An evening that held so much promise ended in frustration an d failure. I suppose I should get used to this in time.
Now in the cold light of day (evening) I’ve had the camera apart again, this time using my Multi-meter in continuity mode to make sure the parallel signal was reaching the 4016. It was, I reassembled the camera and plugged it in again. It still didn’t work. Eventually, I tried something that I’d tried last night, but which didn’t seem to make too much sense. I changed the SC LX settings so that 1’s were 0’s and vice versa. It worked! Why did it work last time with zero as on and now 1 is on, I don’t know, but I’m glad it worked.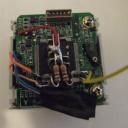
I had said in a previous post that I’d take out the LED the next time I had the camera apart, but I haven’t, I don’t think it interferes with the image at all and the risk of me smearing solder over every exposed pin on the camera board far outweighs any benefit I may get from removing it.
So there we are, until the next clear night, I’ve learned a valuable lesson, while it’s pouring with rain use the time wisely to check the equipment is in perfect working order for that once in a blue moon opportunity to stand out in the cold and look skywards.
Tuesday 17th July 2007
I’ve been having a look at how best to combat a not-so-well-aligned and poorly tracking mount for astro imaging and it seems the preferred way is to use auto-guiding. A quick scan around the Internet and I found myself at Shoestring Astronomywhere the dollar exchange rate made the parallel port autoguider interface look very atractive.
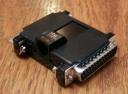
In fact is was that atractive that, as the saying goes, “I couldn’t leave it on the shelf”. It may take up to 6 weeks to ship from the States but that gives me time to work out how I’m going to use it.
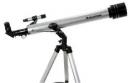
My son’s teacher Mr Nolan very kindly donated a 60mm refracter to the cause and although the mount is not up to much I’m sure if I can piggy-back it onto the Skywatcher 250 I can use my 1004x camera as an autoguider. The Shoestring parallel port interface uses different control lines to the long exposure mod on my SPC900NC so it’s possible to use the port to control both devices at the same time.
My next task it seems is finding a way to mount this scope piggy-style. There are expensive solutions for mounting larger scopes which comprise of dovetail and telescope rings which fit onto the rings of the 250, but I’d prefer to take the “shoestring” approach after spending my savings (and my future savings) on the EQ6.
A 30cm dovetail bar is around £17 and I think I’ll need this at least but then I may have to make the rings or whatever solution is required to attach the scope. If anyone has any ideas please feel free to comment, I’m open to suggestions.
So there’s my task, how to mount a 70mm refracter onto the SkyWatcher 250 before my autoguider arrives. I’ll let you know how I get on.
Software to control the autoguider will be my second task. Again I’ve searched high and low and found some products that look like they’ll do the trick.
All those listed seem to work with the Shoestring autoguider interface but until I get the hardware setup I’ve no way to compare them.
K3CCDTools looks impressive, and I already use the software for long exposure image capture, so it may be that I’ll stick with what I know. On the other hand PHD Guiding appears to be very simple to setup and may allow me to be up and running in less time.
Sunday 8th July 2007
After weeks of cloudy days and rainy evenings, I was desperate to start imaging with the modified SPC900 again. We had family over for a meal and with the evening being dry we sat outside to make the most of this British summer! I couldn’t believe there was not a cloud in the sky, perfect viewing conditions and when the conversation turned to looking at the stars I offered to get the scope out and show everyone the rings of Saturn.
I was too late to get Saturn as it ducked down below the neighbours trees, and my hasty setup made the goto less than accurate. I turned the scope to Jupiter but the modified SPC900 didn’t seem to work well in video mode anymore and the picture was breaking up quite badly. I’d also not collimated the scope for some time so when I did get Jupiter in focus there was very little detail visible. This was the first time I’d managed to get Jupiter with the 3x barlow and I was very impressed with the size of the image as displayed on the screen, next time I’ll make sure I have the Trust camera handy.
With a full belly and a beer or two inside me I was ready for my bed when our guests left, but as everything was setup I thought I’d make the most of the weather conditions and spend an hour imaging.
I imaged through the night and only stopped when the sky turned a light blue in the east and dawn was not too far away. I’d been tracking M31 over the roof of my house when I realized the stars were starting to fade into the lightening sky, so after a quick glance at my watch I thought I’d pack up. 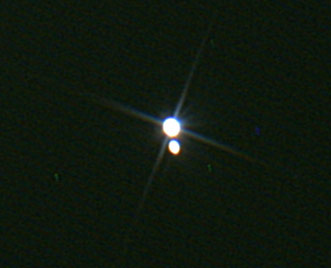
In 5 hours I’d managed to work through a list of Messier objects that I’d prepared for such an occasion and have captured M5, M10, M11, M12, M13, M51, M53, M57, M81, M82, M92 as well as one of my favourite stars Cor Caroli.
Towards the end of the session I picked out a double star in Hercules and was disappointed to find that I really should have taken the time to line up my optics correctly. The double star appeared as two fuzzy points rather than the pin points I was hoping for. I fetched by 3x barlow and laser collimator and performed a quick primary alignment using the barlowed laser method. This is very quick and easy and I was kicking myself that I hadn’t done this earlier. If you haven’t tried it do a quick search on Google for Barlowed Laser 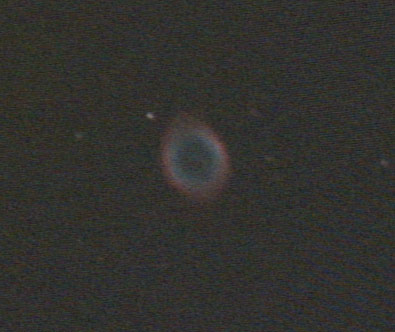 Collimation.
With the primary mirror now pointing in a different direction to where it had been when I aligned the mount, I did another 3 star alignment. What a difference it makes to have everything pointing in the same direction. When I tapped M57 into the hand controller I was amazed to see the Ring Nebula appear just off center on the screen. Awesome. I’d never seen M57 before and had resigned myself to only capturing bright nebula like M42 in Orion.
I’ve got some processing to do now to make the most of the images I captured but a quick look through them seems promising.
I’m not happy with the EQ-6 tracking at the moment, I wasn’t able to capture more than 10 -15 seconds without the stars stretching into ovals so I’ll have to look into how I correct the tracking errors. When I find the answer I’ll post it here.
Update
I’ve just added a Messier Catalogue to the images section, I’ll need to sort out longer exposures before I can fill in the missing M’s.
![]()
Update Update
I forgot to say, when I took the mount apart the following morning I found that I hadn’t tightened the bolt that joins the mount to the tripod after I’d adjusted the azimuth alignment. I should be glad the whole lot didn’t fall off the mount rather than worry about a few stretched stars!
Thursday 28th June 2007

First Light
There was a small break in the clouds last night and even though I’d been awake since 3:30am I couldn’t let the opportunity pass me by.
I had a little trouble with goto not being 100% accurate but I put this down to my hurried setup, I was able to find M3 and M13 and of course Jupiter, but it was very close to a bright moon and low in the southern sky which didn’t make the best viewing conditions.
The image above is a single frame of M3 (20 seconds), I’ve not had time to do any fancy post processing and it looks like my collimation is still out. I’ll post more when I have time.
Proudly powered by WordPress.
Theme: Flat by YoArts.