Saturday 4th February 2012

M101 28 x 10 minutes

Galaxy

GalaxyGalaxy

Galaxy

Galaxy

Weather report: Brrrrrr!  We’ve had excellent clear skies for the last 3 nights and with the clear skies comes the cold at this time of year.  The observatory has been down to -5°C but we’re in a warm spot here and temperatures on the drive to work have dropped to -9°C! The cold weather from Siberia has been dry which has kept mirrors and lenses mist free and no wind has added to the perfect viewing conditions.

My only complaint is the moon has been very bright which with frames up to 20 minutes each has caused a lot of over-exposure which I’ve had to attempt to process out. Multiple 10 minute exposures have been the norm with few spoiled frames due to the lack of wind.

Aiming away from the moon has limited my targets and concentrated mostly around the Ursa Major area.

One of my favourite Galaxies sits in this area – M81.  Galaxy M81 and it’s close neighbour Galaxy M82 made good targets for the Atik16ic and the Philips webcam but I’ve struggled to get clear consistent images with the Canon.  Here’s my latest effort:

Galaxy M81 16 x 12minutes iso800

M81 16 x 12minutes iso800

Galaxy M82 cropped from the same frames is here:

Galaxy M82 16 x 12minutes iso800

M82 16 x 12minutes iso800

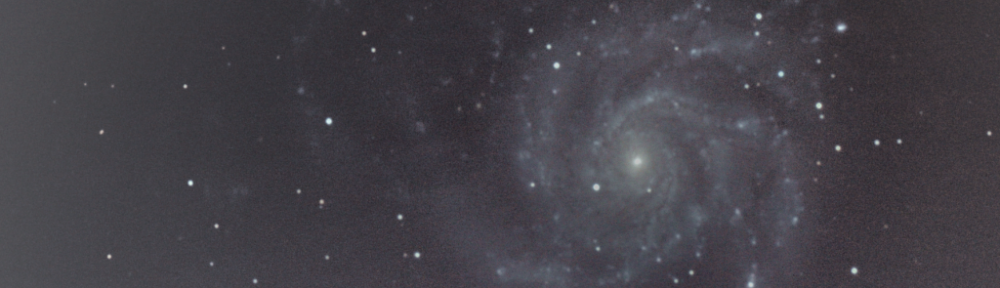
Spiral Galaxy M101 with the recent Super Nova SN-2011fe made an interesting smudge on my test frame so I left the camera running through the night taking 10 minute sub-frames.

Galaxy M101 28 x 10 minutes

M101 28 x 10 minutes

I think this is my best M101 so far :)

M106 is another galaxy that I’ve imaged before and this image is a composite of 8 best frames from a set of 24 again taken through the night.  There’s some faint fuzzies visible and some faint spiral arms outside of the usually imaged inner disk.

Galaxy M106 8 x 15minutes

M106 8 x 15minutes

M51 is another Galaxy, or double Galaxy, that I’ve imaged many times before.  As with all these galaxies any movement of the camera results in loss of detail in the final image. I’m disappointed with this one although there are positives to be taken from it. All the images are processed with Deep Sky Stacker and the resulting 16 bit TIFF files are processed in GIMP which can only handle 8 bit TIFFs. As a result the images published here are not the same as the originals.

Galaxy M51 5 x 5 minutes

M51 5 x 5 minutes

Taking a break from the galaxies I turned the scope to M44 the Beehive Cluster. I’ve been very impressed with the individual star definition in the images I’ve taken this week and I thought a cluster would give me some raw materials to explore this.  As it turned out I have better examples from other images but I’m happy with the way this turned out.

M44 10 x 2 minutes

M44 10 x 2 minutes

Stars:

The bright star in this next image is magnitude 10.3 so I’m guessing the neighbouring star is a little fainter.  I’ve been impressed by the way these stars have remained separate and have noticed on some frames stars overlapping with clear definition between the two.  I’ll have to go back through the frames to find a good example.

Faint Stars

Faint Stars

More stars showing an assortment of sizes and magnitudes but all very clearly defined.

Nice and Round

Nice and Round

The Baader MPCC has made a fantastic difference to the images with round stars across the whole frame.  My only problem has been getting the camera square to the light path with rugby ball stars resulting.  I’ve changed all the bolts on the focuser in an attempt to square things up and I think I may have fixed it :)

Failed: I have some frames from the NGC2237/NGC2246 Rosette Nebula area in Monoceros but the unmodified Canon isn’t able to pick up much nebulosity in the area. This is where a large format CCD would really come into its own. Maybe one day, if my numbers come up on the lottery.

Waiting for more clear skies …


 28th January 2012

I spent some time this afternoon modifying the focuser (putting some shims under 1 side) and changing the bolts from the original to longer bolts.  I knew this would mess up the collimation and the focus but I’ve been pulling the camera to one side with tape in an effort to get the light path straight and I though this would be a more permanent solution.

I’m not sure what the correct method is to square the focuser to the tube but I held a straight edge across the opening of the tube and through the centre line of the camera.  Its crude but it appears to have worked with a few washers helping to make everything square (ish).

Looking forward to the clear skies I started early and quickly collimated and focused and even though the bright stars had halos I was ready to capture some long exposures. It’s now just 19:23 and already the clouds are too thick and there is a threat of rain (or snow) so I’ve had to close the roof – doh!  If it clears up later I may have another go but I think that could be the last “session” in January.

Mount: EQ6 Pro
Telescope: SkyWatcher 250 254mm aperture, 1200mm focal length
Camera: Canon 300D (unmodified)
Mount COntrol: EQMOD (eqascom)
Guide scope: StarChaser 80
Guide camera: Atik 16ic mono
Guide Software: PHD Guiding
Other Software: Cartes Du Ciel
Deep Sky Stacker
GIMP image processing

Tuesday 17th January 2012

We’ve had a couple of clear nights between the end of last week and last night, but I think it’s all change now for at least for the rest of this week.  This blog is more like a weather forecast sometimes, maybe I should get a weather station to keep an accurate record …

With the trees bare I now have good views south and sweeping around through the east to the north east.  The view is blocked at lower levels by houses to the east and next door’s shed to the north but can’t grumble :)

Given this view and this time of year I’ve been trying to get to grips with CDC (Cartes du Ciel) to locate deep-sky objects that may be of interest.  The obvious and probably favourite of most amateurs M42 the Orion Nebula is currently perfectly positioned in the early evening but crosses the meridian as the night progresses and as this would require some setting up I tend to move on to other objects.

I think I’ll change the format of this blog at some point as I’m starting to take multiple shots of the same objects which could now have pages of their own.

Comparing my efforts with “Google Images” it seems I still have plenty of room for improvement!

I’m not the most patient of people so taking long exposures drives me crazy but over the last few nights I did manage to get 2 x 20 minute guided exposures of M45 (The Pleiades). A misted primary made the images look a little out of focus, I even found frost on the secondary so under those conditions anything was a bonus.  But still 20 mins is a lot of photons so hopefully this bodes well for the future.

Oh yes, VIGNETTING is starting to become an issue.  Is the focus tube extending too far towards the secondary? maybe, maybe I need to get to the bottom of it or find a good way to remove it in the processing.

So over the last few days I’ve taken these shots:

2012-01-12:

M42 The Orion Nebula (10 x 2 minutes)

2012-01-15:

The Horsehead Nebula (4 x 10 minutes) it would benefit from more minutes and narrow-band filters, but it's a start :)


M42 The Orion Nebula (5 x 5 minutes)

M45 The Pleiades (5 x 10 minutes)


2012-01-16:

SN2011fe is still clearly visible in M101 the Pinwheel Galaxy.


M45 The Pleiades (2 x 20 minutes)

NGC1977 The Running Man Nebula (9 x 3 minutes)


All images taken/processed:

  • Skywatcher 250 on EQ6 Pro mount.
  • Star-chaser 80 guidescope with Atik 16ic Guide camera
  • Canon 300d with Baader MPCC and skyglow filter
  •  Software: EQASCOM, PHD Guiding, CDC, Deepsky Stacker, GIMP

Thursday 29th December 2011

As the weather is still bad I took the opportunity to collimate the scope – well I hope I have, I’ll need another clear night before I’ll know for sure, but I think it’s close now. My laser collimator wasn’t working and in trying to remove the batteries I took the whole laser unit out.  For those who don’t know the laser unit inside the LC is collimated to ensure the beam is square to the exit hole.

It took a good couple of hours after reassembly to collimate it :(.  Luckily my son was on hand to mark a piece of paper as I turned the LC through 90, 180, 270 degrees and marked where the dot landed.  Adjusting the the grub screws by what appeared to be insignificant amounts had a huge effect on the beam.  I got it to as close as I could – not perfect, but enough to know that over a short distance (like 2.4 meters up and down my OTA) the margin of error shouldn’t be a problem.

Looking at the out-of-focus stars from last nights focusing session I think I took them before the Baader MPCC was aligned (collimate) properly so the image is very misleading.

I need to collimate the scope :(

need to collimate :(

Out of focus star with poor collimation

How bad is that? The shape should be an exact circle and the inner black circle should be perfectly central within the bright circle.  3 of the mirror brackets are visible to the left of the image, they should either all (6 on this model) be visible, perfectly symmetrical around the bright circle or they should all be invisible just outside the field of view.

The rain is hammering against the observatory roof again but at least the wind has died down.  I’m not sure if I’ll get another imaging session in this year, but never say never …

Wednesday 28th December 2011

It’s windy, too windy to do any serious imaging but at least it’s dry.  The clouds are obviously orange where the street lights illuminate them and they’re scuttling across the sky slowly enough to obscure guide stars but quick enough to not completely ruin a 2 minute exposure.

I’ve solved the slewing to wrong location issue, I’m not sure how but it did coincide with me reverting to an older version of ASCOM and adopting Cartes du Ciel in preference to the StarCalc.

Since the last imaging session I’ve:

  • Switched back to the Canon 300d for imaging with the Atik 16ic for guiding
  • Installed dual-speed focuser
  • Installed Baader MPCC
  • Installed Skyglow filter
  • Changed Laptop to donated Acer
  • Adopted Cartes du Ciel as my planetarium platform
  • Designed, built and installed a long-exposure device for the Canon
  • Designed, coded and installed long-exposure software

Not too many changes then ;)

I’ve been waiting all week for a gap in the clouds and tonight, even though the conditions are far from perfect, I took a chance and imaged M42 with 10 x 120 seconds at iso800. While focusing I noticed the collimation is out but the batteries are dead in my laser collimator so I won’t be able to do anything about it tonight. Maybe I can use out of focus bright stars to collimate, I’ll post some focusing images to show what I mean.

In hindsight, I wish I’d taken 30 sec, 60 sec, 90 sec and 120 sec images to allow me to make a HDR composite image, but this was only a test session to make sure everything works.

So here’s my M42, it’s 8 x 120 seconds stacked with DSS (DeepSkyStacker) and taken in windy conditions:

M42

M42

M42 the Orion Nebula (iso800, 8 x 120 seconds, Canon 300d, Baader MPCC, Skywatcher 10" Newtonian, EQ6, EQMOD)

I’m happy with the round stars across the whole image, even with the windy conditions they’re better than I’ve ever imaged before.

Now I need some clear skies …

Monday 19th December 2011

Just a quick update: Condensation in the observatory is very bad at the moment.  The walls are lined internally with wood but the roof is bare metal which loves to grab moisture from the air and drop it on my cameras and laptop :(

In an attempt to fix this I’ve bought some polystyrene insulation boards which I’m attempting to glue to the roof panels.  I’m not too confident about this approach and currently have only glued 2 panels to see if it works.

I’ve changed laptops so the “new” Acer is now set-up as the main controller and my long exposure software is all installed and tested (mental note: must get a photo of the controller).

I’ve run into some problems with the scope control but the weather is too bad to open the roof so I can’t run any tests. Basically the scope seems to point 180 degrees (12hrs) off target!  I’ve checked all the usual suspects like system time, location, software configuration and I can’t find the issue.  I have changed a number of things so tracking down the cause may take a while:

  • Planetarium software changed to StarCalc
  • ASCOM upgraded to 6
  • New laptop installed
  • EQAscom latest version

More to follow …